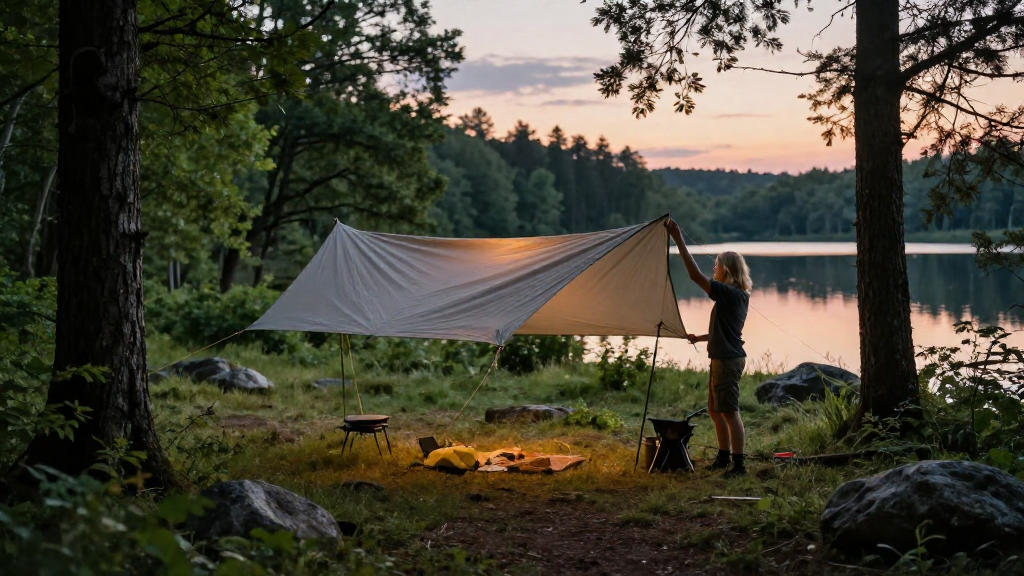
When it comes to camping, knowing how to set up a tarp shelter can be a game-changer.
What is a Tarp Shelter?
A tarp shelter is an essential piece of camping gear that provides protection from the elements.
Whether you’re facing rain, wind, or intense sun, a tarp can keep you dry and comfortable.
With its lightweight design, a tarp is ideal for backpacking and offers versatility in various settings.
Learning how to set up a tarp shelter can vastly improve your camping experience.
Why Use a Tarp for Sheltering?
-
Versatility:
Tarps can be set up in different configurations to suit your needs. -
Lightweight:
Unlike tents, tarps are easy to carry and pack, making them perfect for minimalists. -
Breathability:
Unlike tents, which can trap heat, tarps offer better airflow. -
Cost-Effective:
Tarps are often cheaper than tents and can be made from various materials, reducing your overall camping expenses.
By understanding how to set up a tarp shelter, you can maximize utility while keeping your gear lightweight and compact.
What Equipment Do You Need?
Before you start setting up your tarp shelter, gather the necessary equipment:
-
Tarp:
Choose a tarp made from waterproof materials like nylon or polyester. -
Rope:
A strong, durable rope or paracord is crucial for securing your tarp. -
Stakes:
Metal or plastic stakes can keep your tarp grounded, especially in windy conditions. -
Mallet or Hammer:
For driving stakes into the ground, a mallet can make the job much easier. -
Guy Lines:
These are essential for stabilizing your tarp and keeping it taut.
How to Choose the Right Location?
Choosing a suitable location for your tarp shelter is crucial when learning how to set up a tarp shelter.
Consider the following:
-
Ground Surface:
Look for flat, dry ground free from rocks or debris. -
Proximity to Water:
Always set up your shelter at least 200 feet away from water sources to minimize leaving a trace. -
Wind Direction:
Position your tarp with the open side facing away from the wind to reduce its impact. -
Natural Barriers:
Utilize trees or boulders to offer additional protection from wind and rain.
How to Set Up Your Tarp Shelter?
Now comes the main event: learning how to set up a tarp shelter. Here’s a step-by-step guide:
Step 1: Select the Setup Style
There are several configurations you can use, including:
-
A-Frame:
A simple and effective method where the tarp is draped over a ridge line, forming an ‘A’ shape. -
Tarp Lean-To:
One side is propped up with poles or trees, perfect for wind protection. -
Tent Style:
This method provides excellent protection but requires more setup time.
Choose a style based on your environmental conditions and personal preferences.
Step 2: Lay Out Your Tarp
Unfold your tarp and lay it flat on the ground.
Identify the ridgeline, which is usually the longer side of the tarp.
Step 3: Secure the Ridgeline
-
Tie a Bowline Knot:
Use this to secure your rope to a tree or a sturdy anchor. -
Drape the Tarp:
Place the tarp over the ridgeline evenly, allowing equal length on both sides.
Step 4: Anchor the Corners
Using your stakes, secure the corners of the tarp to the ground.
-
Drive the Stakes:
Enter them at a 45-degree angle for better grip. -
Tension the Guy Lines:
Attach your guy lines to the stakes and tighten them to ensure the tarp is taut.
Step 5: Adjustments
Once everything is staked down, adjust the tarp for proper tension and angling.
Ensure the height under the tarp offers comfortable headroom, while slanting the edges can help prevent water pooling.
Tips for a Successful Tarp Setup
To improve your tarp shelter experience, consider these additional tips:
-
Practice Before You Go:
Familiarize yourself with different setups at home before heading out. -
Use a Ground Cloth:
Placing a cloth under your sleeping area can protect your gear from moisture. -
Keep Extra Rope:
Having extra rope can help you make adjustments without needing to cut or re-tie lines. -
Keep Your Gear Dry:
Store your backpack and other essentials under the tarp to keep them dry.
How Can You Make Your Tarp Shelter Cozy?
Your tarp shelter shouldn’t just be practical; it can be comfy, too.
Here are some ideas:
-
Add a Sleeping Pad:
This will provide comfort and insulation against the cold ground. -
Incorporate a Hammock:
A hammock can add another layer of comfort, especially in warmer weather. -
Use Garment for Wind Barriers:
Hang additional tarps or clothing on the sides to block chilly winds.
What to Avoid When Setting up a Tarp Shelter?
While mastering how to set up a tarp shelter, there are common pitfalls to avoid:
-
Poor Anchor Points:
Avoid using weak branches or flimsy stakes that can easily break. -
Crowded Areas:
Don’t set up your tarp near other campers or close to hazards like large tree branches to prevent accidents. -
Ignoring Local Weather Conditions:
Always check the weather forecast before setting up, especially regarding wind and rain.
Conclusion
Understanding how to set up a tarp shelter can enhance your camping experience significantly.
With the right equipment and techniques, you can create a functional, weather-resistant shelter that meets your needs.
Remember to practice your setup before going out so you feel prepared.
Once you’re confident, you’ll enjoy the flexibility and enjoyment that comes with a well-constructed tarp shelter.
So pack your tarp and gear, and hit the outdoors! 🏕️